Homebrewing VHF Yagi Part 3, Quite Tough!
Homebrewing VHF Yagi Part 3, Quite Tough!
You may be wondering why the continuation part of the series on homebrewing seven element VHF Yagi was delayed. Simple reason is the low level of technical skill! It is almost 11 days, I have been working on making the coax connection and the Gamma match and I am yet to finish it. Thought of posting an update lest you might think that I have dropped the project! Bottleneck in the project was handling an L shaped metal piece needed for mounting the SO 239 connector on the boom and connecting the Gamma match.
I could get an L shaped metal piece of the required width at a very cheap price from the local hardware shop. But it was almost three times the needed length. So I had to cut it to the required length using a hacksaw. It was very tough because it was a hard metal and I am not very much used to using a hacksaw.
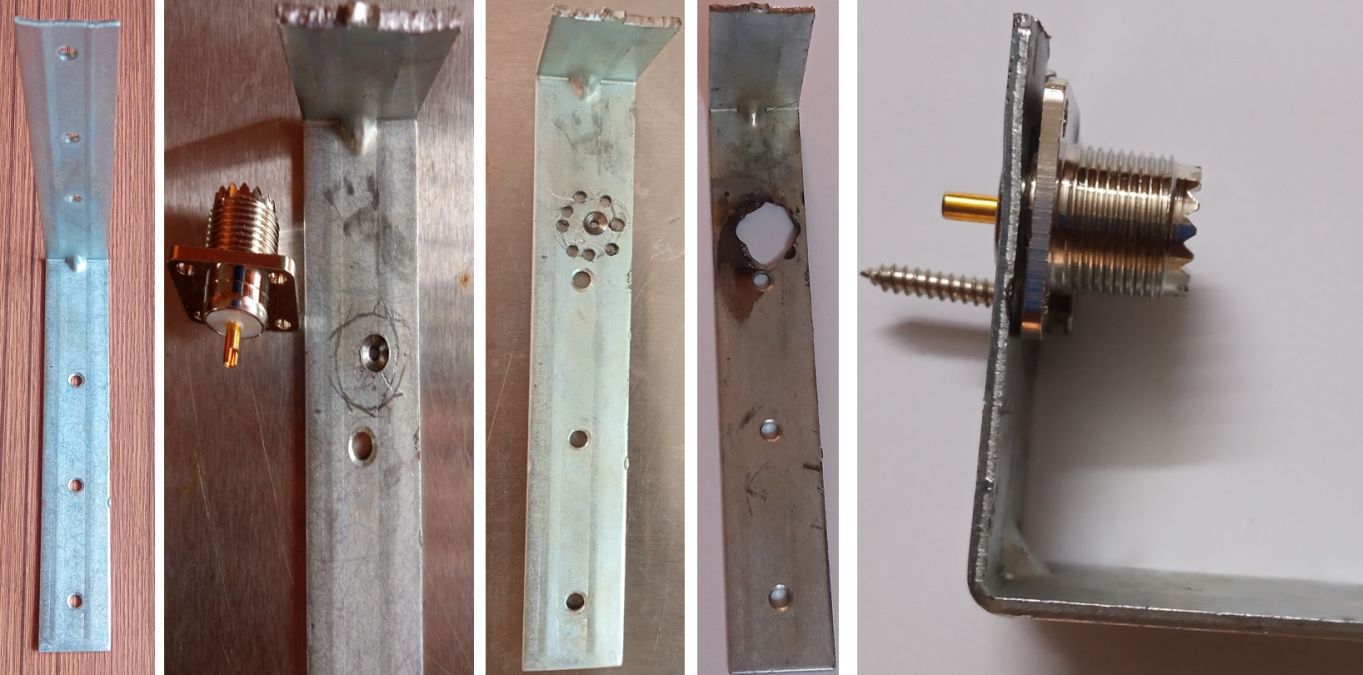
With great difficulty, I could saw off one side of the L shaped metal piece as you can see here. Next I started drilling the hole for the SO 239 connector. I broke 2 or 3 drill bits in the process and could get hardly a small hole. When I used a thick drill bit, it would not advance into the metal piece, it just kept on rotating and producing a small pit.
So I thought of using a smaller drill bit and drilling multiple holes, thinking that I can join them together later to produce a larger hole for the SO 239 connector. But that did not work out well. When I tried to join the holes by drilling in between the holes, the drill bit kept on slipping away.
Finally I took it to the local industrial workshop to get a hole drilled. As expected, they had comments. You could have brought it in the beginning without trying out your silly methods. They drilled the hole in the middle, which was ragged because of the multiple holes drilled earlier. Edges were smoothened by a mechanical file and and welding rod. That is why you can seen the burned areas nearby.
Regarding cutting the other end and drilling holes for the screws for holding the SO 239, they left it to me saying that the metal piece has already become weak and if they try to do it with their machines, it might break off. I managed to cut off the other part of the L shaped metal piece with a hacksaw, with some difficulty as holding it was a problem.
Next I had to drill the holes for screws for holding the SO 239 connector. The right sized drill bit kept on slipping. Again I opted to make a smaller hole with another drill bit and made it a bit larger by rotating the drill bit manually while the drill was in action within the hole so that the edges became just a bit larger for me to push the screw in. Another hole was drilled on the opposite part of the L shaped metal piece for fixing on the boom. Actually two holes are needed, but there is not enough space for using the electrically driven hand drill as the SO 239 has already been fixed. If the metal piece does not get fixed well to the boom, I will have to unscrew the SO 239 for drilling another hole.
By this time I was quite tired and thought of doing the rest of the work another day. Now I know why many people opt for assembling a knock down kit of a commercial antenna than homebrewing it, though cost will be much less. Of course the performance of initial homebrew antennas are also likely to be much lower than a commercially tuned one. Yet that is the spirit of homebrewing, which has not fully disappeared from me after being inactive for three decades!