Installing HamClock in my Refurbished Laptop
Few days back I saw a post online mentioning that one of my Ham Radio contacts had ordered and received a HamClock. Just thought of finding out what it is today. An internet search brought me to the website by WBØOEW. There was an option to buy the rebranded version from elsewhere as HFClock or install the software and run it on Raspberry Pi or a UNIX-like operating system. As I do not have a Raspberry Pi, I decided to use my refurbished laptop in which I had dual boot of Ubuntu Linux and Windows 10. There is also an additional option to view it on any other computer or device connected to the same WiFi network using a browser. That was really wonderful!
It took three attempts to get the HamClock software installed in my laptop, mainly because I am not familiar with the Linux commands. But the instructions given by WBØOEW were enough and I did not have to go for help from any other source. I used both the initial commands and additional commands mentioned for Ubuntu Linux in case of errors. I had to go through the whole sequence three times before I could get the HamClock running. Getting to view it on another laptop running Windows was quite easy through the Chrome browser. Only problem which I found after running it was that the font size was quite small in the Linux laptop. While viewing it the second laptop I could easily adjust the size in the browser using Ctrl + Scroll button on the mouse.
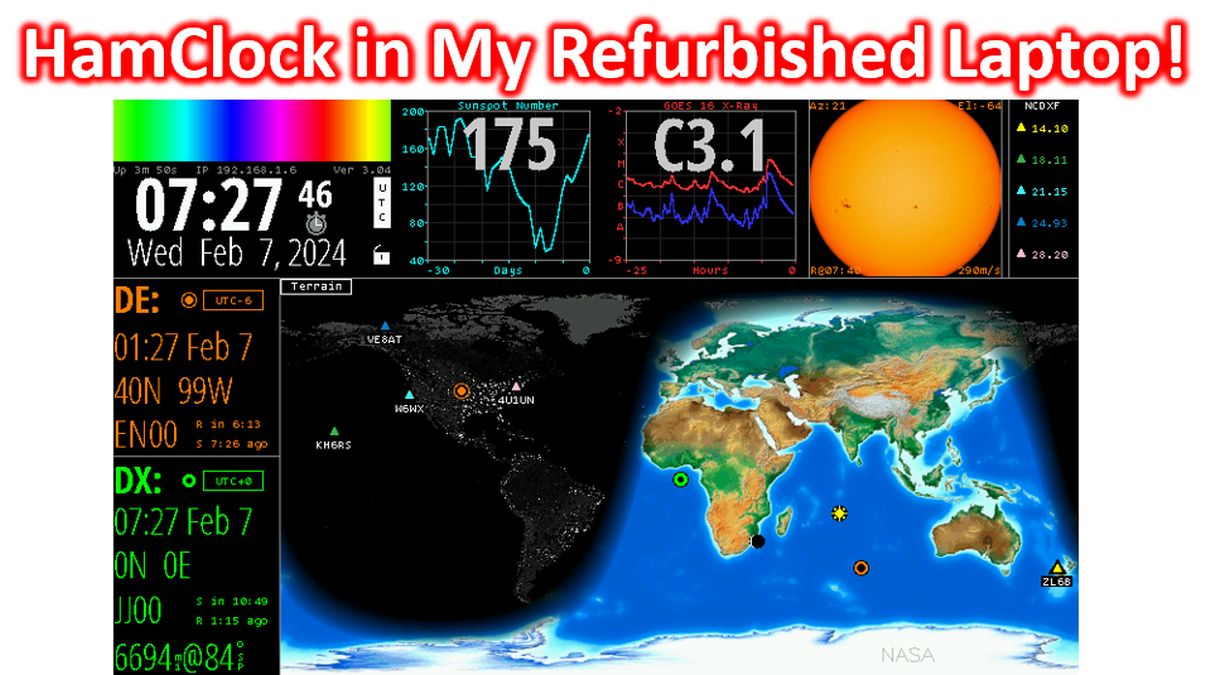
Main date and time display is in UTC. Below that on the left side there is DE for your time and DX time, both of which can be adjusted according to difference from UTC. Though my time zone is UTC+5.30, DE was showing +6 hours. I could not see a provision to change it by 30 minutes. Options were only by hour. Interestingly, if I change it in the browser on the second laptop, it gets changed in the Linux laptop as well! As mentioned on their website, I could see real time space weather with sunspot numbers. Nice picture of sunspots is also there. The large world map shows day and night regions and the terminator region or twilight zone.
If you point at a region on the map, details appear under the TERRAIN heading. Information displayed include latitude, longitude, grid square, CQ zone, ITU region, amateur radio prefix and more. DX cluster information is also displayed on the map.
Clicking on the sunspot number field brings the history of sunspots as a graph in the main screen, right from 1900 to current date. Clicking on RESUME takes you back to the map display.
Clicking below DE gives an option to either enter the grid square or latitude and longitude. This automatically changes the time zone as well. Though initially I could not change the time displayed near DE to my time zone, now it has been corrected! There are many more options for me to explore at a later date.